Measuring Instruments
Neither voltage nor current is visible. You cannot tell by looking at a resistor how many ohms it has. To visualise them, we need measuring instruments that make electrical quantities visible as numbers on a display.
This chapter is intended to prepare you for the lab course. In some places it goes slightly beyond the material covered so far. The concepts of "connecting in series" and "connecting in parallel" only come in the next chapter. I hope you will understand these concepts anyway; otherwise, please ask again in the lecture.
Multimeter
The multimeter is a switchable measuring instrument with which voltages, currents and resistance values can be measured. In the lab we use the HM8012 multimeter from Hameg.
The setting options of the multimeter are shown in the figure below:
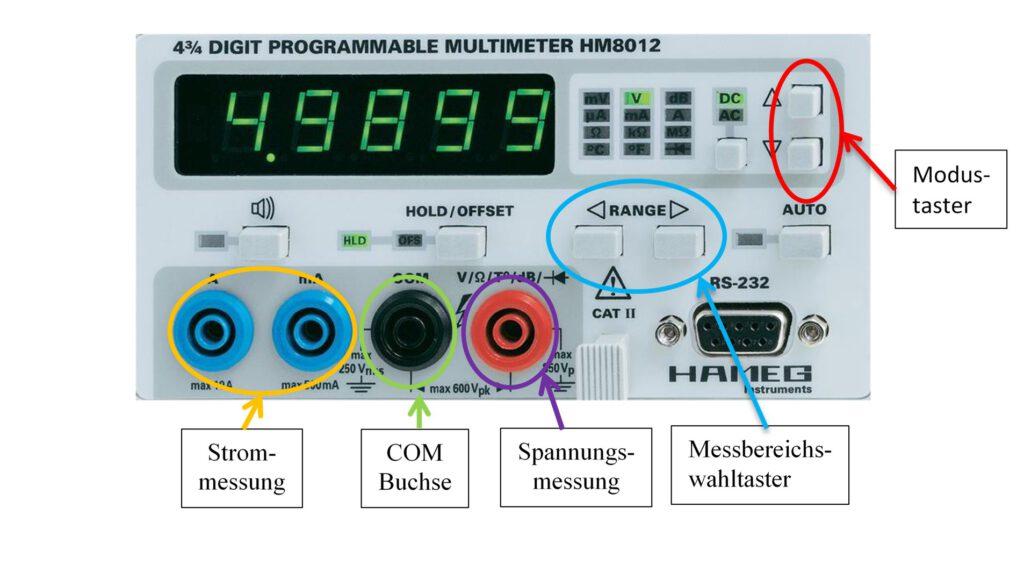
With the mode button at the top right, you select which measurement is shown on the display. If the small V to the left of the display is highlighted in green, the voltage is measured. With the mV setting, you can measure smaller voltages with higher accuracy. The symbols mA and A denote a current measurement. So with the mode button you select which quantity is to be measured. You then still have to choose the appropriate input sockets – but this is explained in the next chapters.
When you change the measuring range with the two RANGE buttons, more or fewer digits of the measured value are displayed. The measurement has a coarser or finer resolution. If, for example, you measure the voltage 1.00147 V and do so in a coarse measuring range, the value 1.00 V is displayed. The remaining digits are ignored. If you select a very fine measuring range, more digits are displayed, in this example 1.00147 V. A measurement in a fine measuring range takes longer; one in a coarse measuring range is very fast. In the lab you should always use the finest possible measuring range.
The measurement of voltage, current and resistance is explained in more detail in the following chapters.